
DIY Beginner Quilting / How to Set Up a Quilt on a Quilting Frame the Easy Way


In this post, which is part two of my DIY quilting series, I show you how to set up a quilt on a quilting frame using a traditional method that many crafters have never seen before.
 Making a quilt is a rewarding experience. There’s just something special about piecing colorful fabrics together, tying or quilting them, and connecting with others.
 If you missed part one, where I demonstrated how to make your quilting frames out of wood, be sure to check that out first.
Now, let’s attach the fabric and batting to the frame so you can start your quilt!
Materials You’ll Need
Before we begin, gather the following materials:
- Quilting frames – If you haven’t made yours yet, watch part one of this series.
- Fabric – I made a baby quilt for this tutorial and cut the fabric pieces (36” x 43”).
 I chose a striped cotton fabric for the top and a neutral-colored flannel for the backing.
- Batting – I use a natural cotton batting, but polyester batting is also an option. Polyester batting tends to have more loft and makes for a cozy quilt, while cotton works well for hand-stitched quilts.
- C-clamps—These hold the boards of the quilting frame together. I use 2.5” clamps, but 2” to 4” clamps will also work.

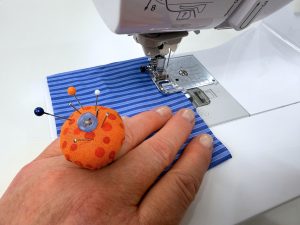
- Pins – Lots of them! I use a wrist pin cushion for easy access while working. Stay tuned for the pattern and the tutorial on how to make one of these.
- Quilting frame stands (optional) – If you don’t have stands, you can use four chairs, your couch, or even set up the frame on a clean floor.

Step 1: Preparing Your Fabric
Cut your quilt top to 40” x 44.5” or whatever size you want.
Cut the backing and batting slightly larger than the quilt top to allow for any shrinkage during quilting.
 For the batting, I’m using pre-cut cotton batting that comes in a 45” x 60” package, which works well for crib-sized quilts, however, I’m going to cut it down for this small quilt.
If using cotton batting, remember that your stitches should be closer together than polyester batting.
 Mark the halfway points on your quilt top and backing fabric by folding each side in half and mark the center point using a pin or erasable fabric marker.
You’ll also need to mark the halfway points on your frame boards.
 This will help align everything evenly during setup.
Step 2: Attaching the Fabric to the Frame


1-Set up your quilting frame. If using stands, get them ready. Otherwise, position the frame using the back of chairs or set it up on the floor and put it on the stand.
2- To start, the boards should be close together. Then, establish which boards will be the sideboards and the top/bottom boards.
Pin from the center outward, leaving about 6 inches unpinned on each end.
3- Position the backing fabric. Drape the backing fabric over the side boards with the right side of the fabric facing down.
4- Pin the backing fabric. You will pin one side at a time. Match the center mark on the fabric with the center mark on the board.
5- Attach the top and bottom boards. These boards will rest on top of the sideboards. Let the fabric drape down until all sides are pinned to the boards. Pin the fabric in the same way.
 Now, you can start to move the stands and boards further apart.
Do not pull the fabric too tight—smooth it out so it is flat.
 6- Secure the frame with C-clamps. Adjust the crossing points of the boards so the fabric lays even and is squared, then tighten the C-clamps at each corner. (You should not see any pulling or stretching of the fabric).
7- Add the batting – Gently lay the batting on top, centering it. (Do not pull or tug the batting).
(Remember that the backing fabric was cut a little larger, so allow the fabric to come in on the frame about 1 ½ inches from the board’s inner edge).
Once that side is complete, go to the other side’s board and do the same thing.
Pin it in place just like the backing fabric. (You don’t need to put as many pins in the batting).

8- Attach the quilt top – Lay the quilt top right side up, aligning it with the center marks on the board.
Pin the center points first. Then pin in the same manner, from the center out. (The quilt top will be smaller.)
If you need to add or remove pins to get all layers pinned to the fabric strip on boards, do so.
 9- Adjust C Clamps. At this stage, go around to all the C clamps and loosen and tighten them to adjust the fabric so it is squared up and the quilt top is smooth but NOT PULLED TIGHT!

Step 3: Choosing a Quilting Method
You’re ready to get to work once your quilt is secured on the frame. Yay!
There are several ways to finish your quilt:
- Tying—This is a simple method in which you tie knots at intervals across the quilt. (It is a great option when using polyester batting and when you want to finish a quilt quickly.)
A tied quilt with polyester batting is quite cozy; that is what my kids prefer.
You can view a tutorial showing how to tie a quilt HERE.

- Big stitches—For this baby quilt, I used lightweight crochet thread to make large stitches along the stripes in my fabric. I decided to add a small tie as well. (photo above).

- Hand quilting—If you want a more intricate design, you can quilt around specific patterns on your fabric using quilting thread. I recommend using cotton batting for this method.
This method can take a lot more time, but it will give you that old-time crinkly look that we all love in a vintage quilt.
I’ll demonstrate different quilting stitches in a future post, so stay tuned for that!


Final Thoughts
I hope this post inspires you to try quilting the old-school way!
Remember to download the free quilting size chart from my website, YouMakeItSimple.com, and check out my other patterns and DIY tutorials.
Let me know in the comments if you’d like a tutorial on making a wrist pin cushion—it’s such a handy tool!
Stay tuned for the next video, in which my husband will show you how to make your own quilting stands.
Happy quilting!



2 Comments
Hi Jan! Thank you so much for this tutorial series! I’m not a quilter (currently anyway, my mom is determined to get me back into it!) but I am do embroidery and other hand stitched projects. I’ve been dreaming up a very large piece (2×4 ft) and have been struggling to get the frame figured out, until I remembered “helping” my mom quilt at her frame when I was about 4. I’ll be headed to the hardware store soon! This will be perfect!
Wonderful to hear. Let me know how it goes.
That’s exciting.
-Jan