DIY Beginner Quilting / How to Set Up a Quilt on a Quilting Frame the Easy Way

diy quilting frame setup
quilting frame series part 2

In this post, which is part two of my DIY quilting series, I show you how to set up a quilt on a quilting frame using a traditional method that many crafters have never seen before.

QUILTING FRAME FABRICMaking a quilt is a rewarding experience. There’s just something special about piecing colorful fabrics together, tying or quilting them, and connecting with others.

quilting frames with friendsIf you missed part one, where I demonstrated how to make your quilting frames out of wood, be sure to check that out first.

Now, let’s attach the fabric and batting to the frame so you can start your quilt!

Materials You’ll Need

Before we begin, gather the following materials:

  • Quilting frames – If you haven’t made yours yet, watch part one of this series.
  • Fabric – I made a baby quilt for this tutorial and cut the fabric pieces (36” x 43”). I chose a striped cotton fabric for the top and a neutral-colored flannel for the backing.QUILTING FRAME BATTING
  • Batting – I use a natural cotton batting, but polyester batting is also an option. Polyester batting tends to have more loft and makes for a cozy quilt, while cotton works well for hand-stitched quilts.
  • C-clamps—These hold the boards of the quilting frame together. I use 2.5” clamps, but 2” to 4” clamps will also work.quilting frame wrist pincushion
  • Pins – Lots of them! I use a wrist pin cushion for easy access while working. Stay tuned for the pattern and the tutorial on how to make one of these. 
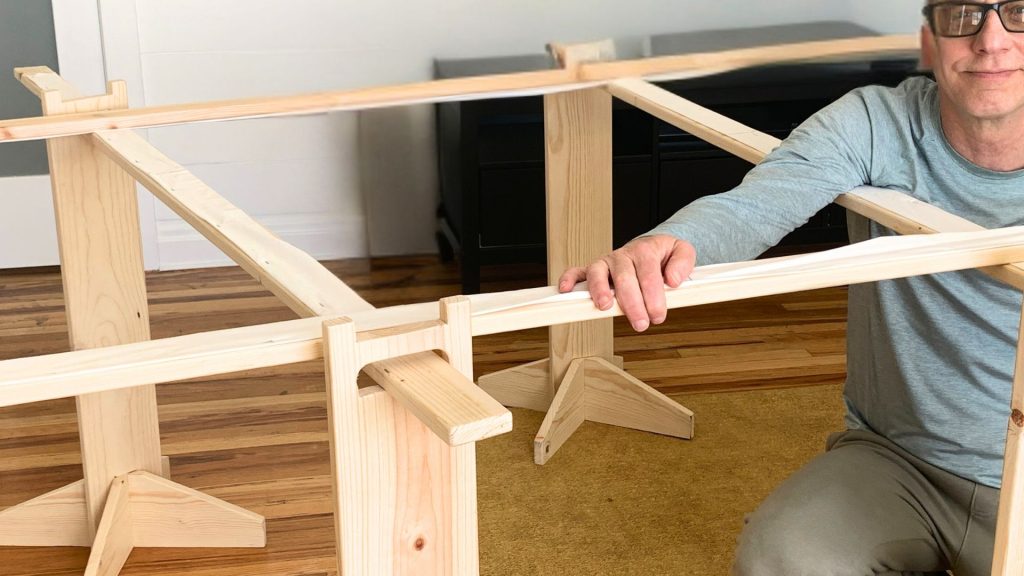
  • Quilting frame stands (optional) – If you don’t have stands, you can use four chairs, your couch, or even set up the frame on a clean floor.

To make it easier for you, I’ve created a downloadable PDF with quilting size guidelines from baby to king size.

Click on the link below to download and print a copy of the quilting size chart.

Step 1: Preparing Your Fabric

Cut your quilt top to 40” x 44.5” or whatever size you want.

Cut the backing and batting slightly larger than the quilt top to allow for any shrinkage during quilting.

QUILTING FRAME BATTING
For the batting, I’m using pre-cut cotton batting that comes in a 45” x 60” package, which works well for crib-sized quilts, however, I’m going to cut it down for this small quilt.

If using cotton batting, remember that your stitches should be closer together than polyester batting.

QUILTING FRAME HALFWAY POINTMark the halfway points on your quilt top and backing fabric by folding each side in half and mark the center point using a pin or erasable fabric marker. 

You’ll also need to mark the halfway points on your frame boards. 

This will help align everything evenly during setup.

Step 2: Attaching the Fabric to the Frame

1-Set up your quilting frame. If using stands, get them ready. Otherwise, position the frame using the back of chairs or set it up on the floor and put it on the stand.

2- To start, the boards should be close together. Then, establish which boards will be the sideboards and the top/bottom boards.

Pin from the center outward, leaving about 6 inches unpinned on each end.

3- Position the backing fabric. Drape the backing fabric over the side boards with the right side of the fabric facing down.

4- Pin the backing fabric. You will pin one side at a time. Match the center mark on the fabric with the center mark on the board.quilting frame

5- Attach the top and bottom boards. These boards will rest on top of the sideboards. Let the fabric drape down until all sides are pinned to the boards. Pin the fabric in the same way.

quilting framesNow, you can start to move the stands and boards further apart.

Do not pull the fabric too tight—smooth it out so it is flat.

QUILTING FRAME6- Secure the frame with C-clamps. Adjust the crossing points of the boards so the fabric lays even and is squared, then tighten the C-clamps at each corner. (You should not see any pulling or stretching of the fabric).

7- Add the batting – Gently lay the batting on top, centering it. (Do not pull or tug the batting).

(Remember that the backing fabric was cut a little larger, so allow the fabric to come in on the frame about 1 ½ inches from the board’s inner edge).

Once that side is complete, go to the other side’s board and do the same thing.

Pin it in place just like the backing fabric. (You don’t need to put as many pins in the batting).

QUILT FRAME

8- Attach the quilt top – Lay the quilt top right side up, aligning it with the center marks on the board.

Pin the center points first. Then pin in the same manner, from the center out. (The quilt top will be smaller.)

If you need to add or remove pins to get all layers pinned to the fabric strip on boards, do so.

QUILT FRAME C CLAMPS9- Adjust C Clamps. At this stage, go around to all the C clamps and loosen and tighten them to adjust the fabric so it is squared up and the quilt top is smooth but NOT PULLED TIGHT!

quilt frame

Step 3: Choosing a Quilting Method

You’re ready to get to work once your quilt is secured on the frame. Yay!

There are several ways to finish your quilt:Upcycled Denim Jeans

  • Tying—This is a simple method in which you tie knots at intervals across the quilt. (It is a great option when using polyester batting and when you want to finish a quilt quickly.)
    A tied quilt with polyester batting is quite cozy; that is what my kids prefer.

You can view a tutorial showing how to tie a quilt HERE. 

big stitches quilt frame

  • Big stitches—For this baby quilt, I used lightweight crochet thread to make large stitches along the stripes in my fabric. I decided to add a small tie as well. (photo above).

quilt frame stitches kolby

  • Hand quilting—If you want a more intricate design, you can quilt around specific patterns on your fabric using quilting thread. I recommend using cotton batting for this method.

This method can take a lot more time, but it will give you that old-time crinkly look that we all love in a vintage quilt.

I’ll demonstrate different quilting stitches in a future post, so stay tuned for that!

rolling quilt frame

Step 4: Rolling the Quilt for Stitching

The boards on the top and bottom of the quilt were set up so you could roll the quilt as you go to have better access for quilting.

Once you can’t reach to stitch, it’s time to “roll the boards.”

1- Loosen the C-clamps at the corners of the boards you want to roll.
2- Remove pins about 12 inches from the edge

3- Roll the boards a few times until you have a close working space, but not so close that you can’t stitch.

4- Re-clamp the frame to hold the quilt in place.
You might need someone to help roll the fabric evenly on both sides for larger quilts.

storing quilt frame

Step 5: Storing and Moving Your Quilting Frame During the Quilting Process

One of the great things about using a quilting frame is that it’s portable.

If you need to move your quilt while working on it, lift the entire frame carefully (you may need help for larger quilts).

Turn it on its side and lean it against a wall out of the way. You could even move it to another room if you wanted.

If homemade stands are used, they can be easily disassembled for storage.

Bringing Back the Tradition of Quilting Bees

I want to start a monthly quilting bee with family and friends to make the quilting process even more enjoyable.

We’ll gather, chat, and quilt together like in the old days.

This will be a great way to use some of my flannel fabric stash for donation quilts and gifts!

Final Thoughts

I hope this post inspires you to try quilting the old-school way!

Remember to download the free quilting size chart from my website, YouMakeItSimple.com, and check out my other patterns and DIY tutorials.

Let me know in the comments if you’d like a tutorial on making a wrist pin cushion—it’s such a handy tool!

Stay tuned for the next video, in which my husband will show you how to make your own quilting stands.

Happy quilting!

Share:

Facebook
Twitter
Pinterest

Connect:

Picture of Jan Howell

Jan Howell

Whether it’s a new recipe, a fun craft, or some handy tips for your garden and home, I hope to empower and inspire you with skills that you can use to create joy, improved health, and to do it in a simple way.

Read More

Related Posts

How to Make DIY Quilting Frames: A Simple Guide to Hand Quilting

diy quilting frames
quilting frames generations

Quilting frames have been used for centuries before high-tech machines and elaborate setups.

hand quilting with friendsHand quilting was a tradition that brought people together, sharing stories, laughter, and creativity while making something beautiful and practical.

This social gathering was referred to as a “quilting bee”. 

What is the definition of a Quilting Bee?

A quilting bee is a social gathering where people come together to make quilts. The term originated in the United States between 1825 and 1835.

What is the purpose?

  • Community building: Quilting bees provide a place for people to come together and support each other. 
  • Socializing: Quilting bees are a chance for people to gossip, get advice, and console each other. 
  • Completing quilts: Quilting bees allow people to work together to finish a quilt in one day. 

I wish that this was more common nowadays. 

The quilts I have made and the experiences I’ve had with the family gathered around a quilt have driven me to start making more quilts and inviting friends and family over for all of these purposes.

The first step for you to get started would be to make yourself a set of quilting frames.

long arm quilting frames

Quilting today can sometimes feel like an expensive hobby, with fancy machines and costly fabric.

The truth is, you don’t need a long-arm machine or an elaborate setup to enjoy this timeless craft! In this tutorial, I’ll show you how to make your own quilting frames—an easy and affordable way to bring back the joy of hand quilting.

paying under quilting frames
This is my son Sam who is now 30

Why Use Quilting Frames?

I fondly remember playing under a quilt as a child while it was stitched. It felt like a colorful tent, full of warmth and creativity.

Quilting frames are a great way to enjoy this traditional craft, and they’re simple to set up and store.

With these frames, you can:

  • Tie or hand-stitch a quilt with ease.
  • Store small quilts out of the way by leaning them against a wall.
  • Avoid the hassle of having your quilting project take over the entire living room!
  • Avoid thumbtacks

quilting frames with friendsI am so surprised that so many crafters today have never seen this technique before, and I want to bring it back.

Once you try quilting with these frames, you’ll be hooked!

quilting frames boards

Materials and Items 

Wood boards (labeled as 3×1 at the hardware store, but are actually 2.5 inches by ¾ inches)

  • 8-foot boards work well for lap quilts.
  • Consider 5, 6, or 7-foot boards for smaller projects.
  • Choose straight, knot-free boards.

Fabric strips for attaching the quilt

  • A high-thread-count upcycled sheet works best.
  • Cut into 6-inch strips.
    (Measure the length of the board you are using and subtract 5 inches; this will be the length of the strips).
    You will need four strips of fabric. (DO NOT PIECE STRIPS TOGETHER TO FORM A LONG STRIP.) I recommend using an upcycled sheet with a high thread count. 

 A queen or king sheet works well.

 Instructions

1. Preparing the Fabric Strips

  • Cut four fabric strips to match the length of your boards minus 5 inches.
    Fold each strip in half and press well.
  • Fold it again to measure about 2 inches wide, with raw edges folded in.
  • Staple or tack the strips along the edge of each board, leaving a small gap along the folded edge.
quilting frame boards

2. Selecting and Preparing the Boards

You may have to look through several boards to find some good ones.

  • Choose straight boards without large knots.
  • Sand all edges smoothly to prevent splinters.
    Use a 80-110 grit sandpaper on the first pass and 220 grit paper for the final pass.
  • Wipe the boards with a damp cloth to remove dust.
quilting frames

3. Attaching the Fabric Strips to the Boards

You can staple or nail the strips to the boards. 

  • Place the folded fabric strip along the board’s edge, with the cut edge of fabric on the underneath side.
  • Secure it every 3 inches with tacks or staples.
    Leave about 2-5 inches of space at the board ends.
  • If needed, use a hammer to ensure a flush edge of the staples.

4. Gathering  Supplies for the Next Step

  • C-clamps (2.5-inch recommended, but 2, 4, or 6-inch will also work).
  • Long quilting pins (about 1¾ inches long), or I like to use curved safety pins

When you have your quilting frames ready, you’ll need to learn how to attach your quilt to them.

In the following tutorial, I’ll show you exactly how to set up your quilt on the frame. 

In the 3rd tutorial in the series, my husband will show you how to make your own quilting stands. 

I hope this tutorial inspires you to try hand quilting using a simple, affordable setup.

If you enjoyed this guide, share it with your friends and family.

Stay tuned for the next post in this DIY quilting series!
Happy quilting!

Share:

Facebook
Twitter
Pinterest

Connect:

Picture of Jan Howell

Jan Howell

Whether it’s a new recipe, a fun craft, or some handy tips for your garden and home, I hope to empower and inspire you with skills that you can use to create joy, improved health, and to do it in a simple way.

Read More